Showing posts with label kitchen gadgets. Show all posts

Friday, 8 January 2016

Spiral Ninja Slicer

Crab salad

I've seen numerous blog posts extolling the virtues of clean eating, where the spiralliser has featured extensively. Many of my foodie friends posted fun photos on Instagram, and I really fancied to have a go myself. Not that I will ever want to commit to a pasta-free life or an unappetizing sin-free raw diet.
When I saw on amazon that I could try and test a Spiral Ninja slicer by Already Ninja for a pound in exchange for an honest review, I knew I couldn't miss this opportunity.


I love salads, and getting a spiralliser would let me prettify my salads.
So far I have tested this little kitchen gadget on cucumbers and courgettes, both of which I eat raw added to salads quite often.

Spirallised cucumber


Spiral Ninja is easy to operate, you just insert your chosen vegetable and keep rotating it until the vegetable comes out in thin strips. There are two options - either do wide thin ribbons or the thin spaghetti-like strips, just turn the slicer upside down.

Spirallised courgette

This slicer has extra strong Japanese steel Ninja Blades. The plastic part of the slicer is made with high-grade, food-safe ABS plastic.
Inside the box you will also find a free ceramic peeler, a small storage bag, a flexible cleaning brush (to clean the pesky bits stuck at the bottom of the blade), safety cap and a healthy recipe ebook which I haven't actually downloaded so cannot comment on the quality of recipes.
I liked the compact size of the slicer, it won't take much space on the kitchen shelf.
The funky-shaped vegetables have certainly livened my usual salads.

Crab salad with spirallised cucumber

Apart from salads, I have used this gadget to prepare courgetti.
Just slice the courgette, then give it a quick fry in the olive oil with one finely chopped clove of garlic.
I cooked a standard Bolognese sauce with minced beef, red onion, tomatoes and herbs to go with courgetti.

Courgetti Bolognese


 Courgetti look like great fun, but they really aren't a substitute for pasta. Sorry, but they are not. I'd rather not have pasta at all than pretend that courgetti are a perfect alternative, they are not and they never will be.
If you don't think of them as a substitute for pasta, then the thin courgette noodles are a perfectly nice light meal.
Every year, once January begins, all the media starts talking about healthy diets. Fitness DVDs seem to multiply overnight, featuring inanely grinning celebs in bikinis who share their diet secrets with "lucky" us.
Those showbiz ladies might look glamorous but their diet is so joyless and miserable.
Everything in moderation is fine. If you want pasta, enjoy your pasta. If you want courgetti, well, enjoy courgetti.
As for me, pass me another box of chocolate!


Tuesday, 15 December 2015

EasiYo Yogurt Maker


I've been casting longing glances at the shelves with EasiYo products in Lakeland for a long time, wondering if I should treat myself my family to a new yogurt maker. This iconic brand has been around for 20 years, and just recently a new redesigned  EasiYo yogurt maker has been launched.
The new variety incorporates a host of technical, ergonomic and thermal improvements. It makes 1kg of delicious yogurt, with no artificial ingredients.

EasiYo yogurt maker (image credits - EasiYo)

What do you find once you open the box? There is a red yogurt maker, 1kg yogurt jar and an information leaflet. It is a stylish bright red container.
The entire EasiYo Yogurt Maker and jars are manufactured from US & UK FDA approved polypropylene grade PP130RE1. All parts are BPA-free, which is reassuring to know.


It is incredibly easy to operate. You just fill in the smaller container with water half-way, add the sachet of powdered yogurt mix, put the lid on and shake well. Then top up with more water and shake again. Place the yogurt tub inside the yogurt maker and pour boiling water to the top of the spacer. Cover tightly with the lid and leave it to "cook" for 8-12 hours or overnight. Chill before serving.


This is the sachet I have used - Forest Fruits flavour. I went to Lakeland again today and looked at the range of flavours. Once we finish this tub of yogurt, I am going to try some other flavours, which look very tempting.


I actually took a peek at the yogurt half-way through the process. At that stage the yogurt was very liquid. I was wondering if I was going to end up with a yogurt drink. But I shouldn't have worried.
Once the necessary time passed, the yogurt inside was perfectly set.
It has a silky smooth texture and a delicious taste. A pleasure to prepare and a pleasure to eat.


And it was a total success. My younger son has gobbled up his little dish of yogurt and asked for a second helping. Yay!


Disclosure: I received a yogurt maker for the purposes of testing and reviewing. All opinions are mine.


Friday, 16 October 2015

Tefal OptiGrill


As much as I try to sway my family towards eating more vegetarian meals, we are still pretty much omnivores. In the last few weeks I have been testing Tefal OptiGrill, which is just the right kitchen appliance for anyone who's trying to lead a healthier lifestyle.

Tefal OptiGrill is an electric kitchen appliance for grilling. Tefal promises you can cook a restaurant quality steak with OptiGrill (but more about that later).
You can also cook food straight from the freezer on it.
It retails at £124.99- £150 (depending on the retailer, so have a good look around first if you decide to buy it). At this price, it is more expensive than some other brands of grills.
Is it a good investment?
The first thing I noticed, having unpacked the box, is the sheer size of it. It's a bit of a Hulk in the kitchen, and weighs quite a bit. I had to find space in my already over-crowded kitchen.
It is sturdy and solid, and looks stylishly industrial.


Its key features are an automatic sensor cooking with a thickness measurement and a LED cooking indicator.
There is plenty of room for several pieces of meat, or vegetables.
The handle makes it easy to open and close the metal lid, which presses the food down for even cooking.
Instructions in a small booklet are clear and easy to follow, even for technophobes like me.
Guide to LED colours tells you exactly when the cooking starts, then the colours change as the food is being cooked from rare to medium to well done.
Guide to cooking programmes lets you choose a variety of settings - burger, bacon, poultry, red meat, fish, sausage or manual mode.


Non-stick plates have large grooves which leave a distinct pattern on the grilled food. The lower plate is slightly sloping down for any excess fat or juice to pour into a removable juice collection tray.
As I have mentioned already, the grill is easy to clean. You can unclip the plates and wash them under the tap (or dishwasher). You can also leave it until later (and I do mean much later, like the next day) for cleaning.
Sensor cooking adapts the cooking temperature according to the chosen setting and the thickness of the food.


The first food I have cooked with OptiGrill was a batch of chicken mini-fillets, which came in a pack, already marinated with mango and chilli flavour (found in Tesco). The chicken cooked really fast, with a nice grilled pattern over it.


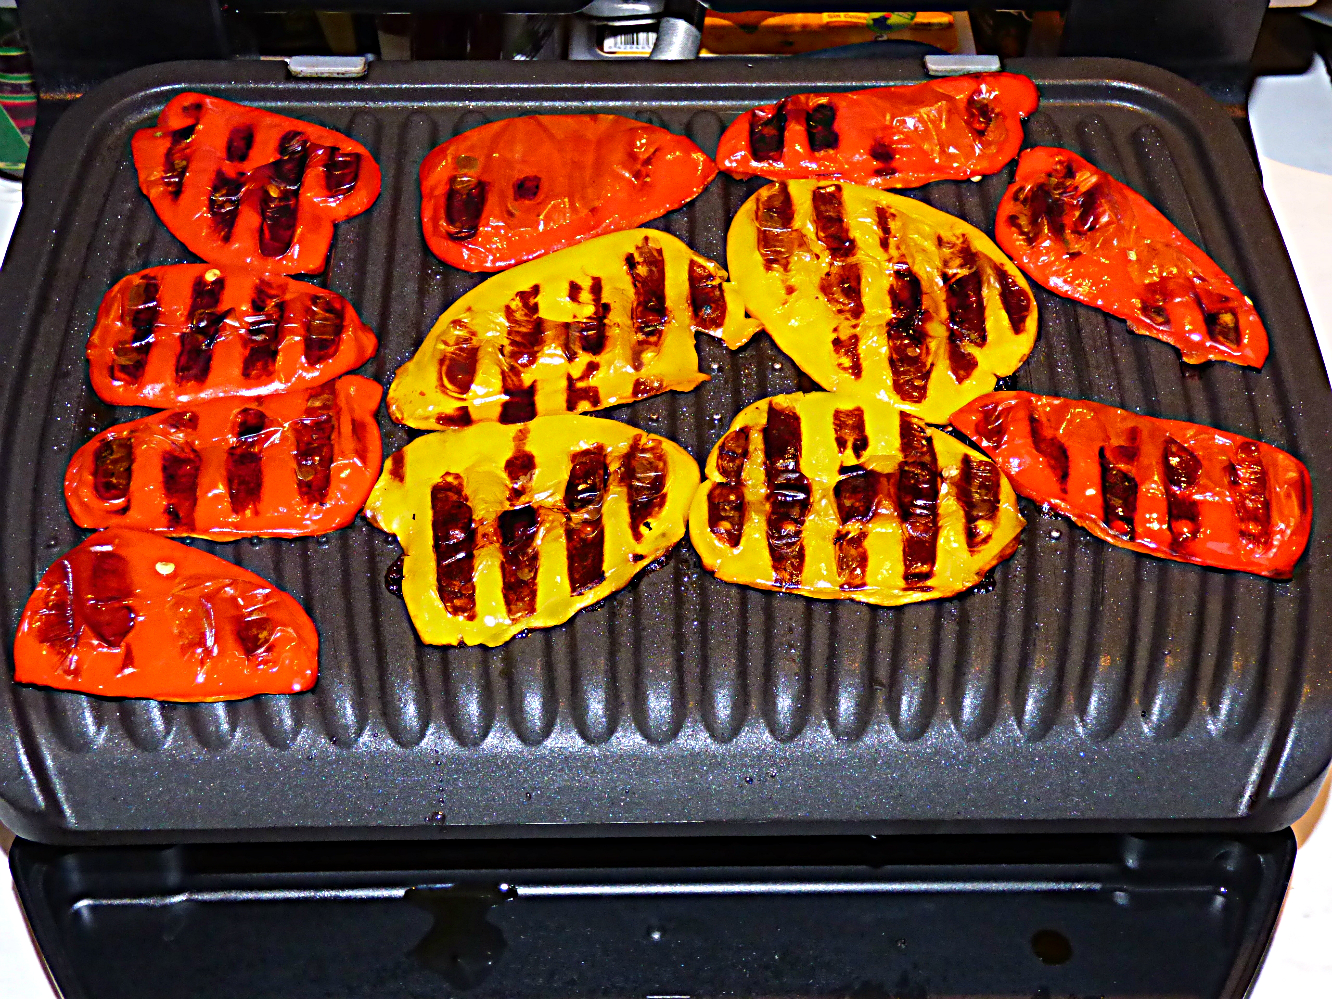
I served them with a cider and cream sauce and grilled peppers.


Kebabs were also grilled to perfection.


For me this gadget proved that it's worth every penny just for the beautiful way it works with sweet peppers. We all love sweet peppers which acquire the most intense sweetness after being grilled. They need a tiny bit of oil. Be careful when you place the pepper pieces over the grill, as they might be slipping down. They don't need much seasoning. I have already cooked sweet peppers several times, using OptiGrill, with different oils, including a chilli-flavoured olive oil.

Mixed grilled
sweet peppers

Overall, we had perfect results with almost every meal I cooked, using OptiGrill. Except that my steaks were a failure. I have clearly overcooked them. I did cook them as well done, but they were thin to start with, and turned out as tough as old boots. If anything, my boots are softer. I'm just not good at cooking steaks.
My husband has politely eaten half of his steak, and said "Sorry, I'm not very hungry". Then polished a whole baguette. I don't blame him.
I will try again, choosing a medium setting next time.


What else did I try to cook on OptiGrill? Burgers were juicy and tender cooked on medium. What is great about OptiGrill cooking is that all the extra fat melts and slides down onto a mini tray which collects all fat and juice.
Just the other day I cooked chorizo-flavoured burgers, and assembled a tower with a poppy seed roll, grilled peppers, burger and mango. It you like a combination of meat and fruit, this is totally lush. Sweetness of mango and peppers goes very well with the smoky spicy flavours of chorizo.


I would definitely recommend OptiGrill - it is easy to use and as easy to clean, it collects all the juice and fat, it allows you to cook healthier foods as it uses less oil, and it is suitable for a wide range of foods.
The only con I can think of is its size. Yet, if the kitchen space is not an issue, then there is nothing to complain about.
It would make a super gift for any foodie.


Disclosure: I received Tefal OptiGrill for the purposes of testing and reviewing. All opinions are mine.


Sunday, 27 September 2015

Casdon Annabel Karmel My Perfect Pastry Set


Annable Karmel doesn't need any introductions. She is a leading expert on children's nutrition and kitchen gadgets, and has inspired a range of baking kits for budding chefs. Both of my boys are interested in cooking, Sasha enjoys his cooking lessons in school, though he's more of an observer when it comes to cooking at home. He also watches a lot of cake-baking videos on Youtube, the more garish, the better. Eddie loves to help me in the kitchen, whenever I bake cookies or cupcakes. Decorating is his favourite bit.
I knew he would be thrilled to try a Casdon Annabel Karmel My Perfect Pastry Set.
Toy company Casdon has created a range of cooking tools for young chefs as inspired and approved by Annabel Karmel. These are perfectly normal kitchen utensils, only suitable for little hands. This set is aimed at children aged 5-11.
Annabel Karmel has written special recipes to go with the range (which also includes a Mini Pizza Set and an Ultimate Baker's Set).


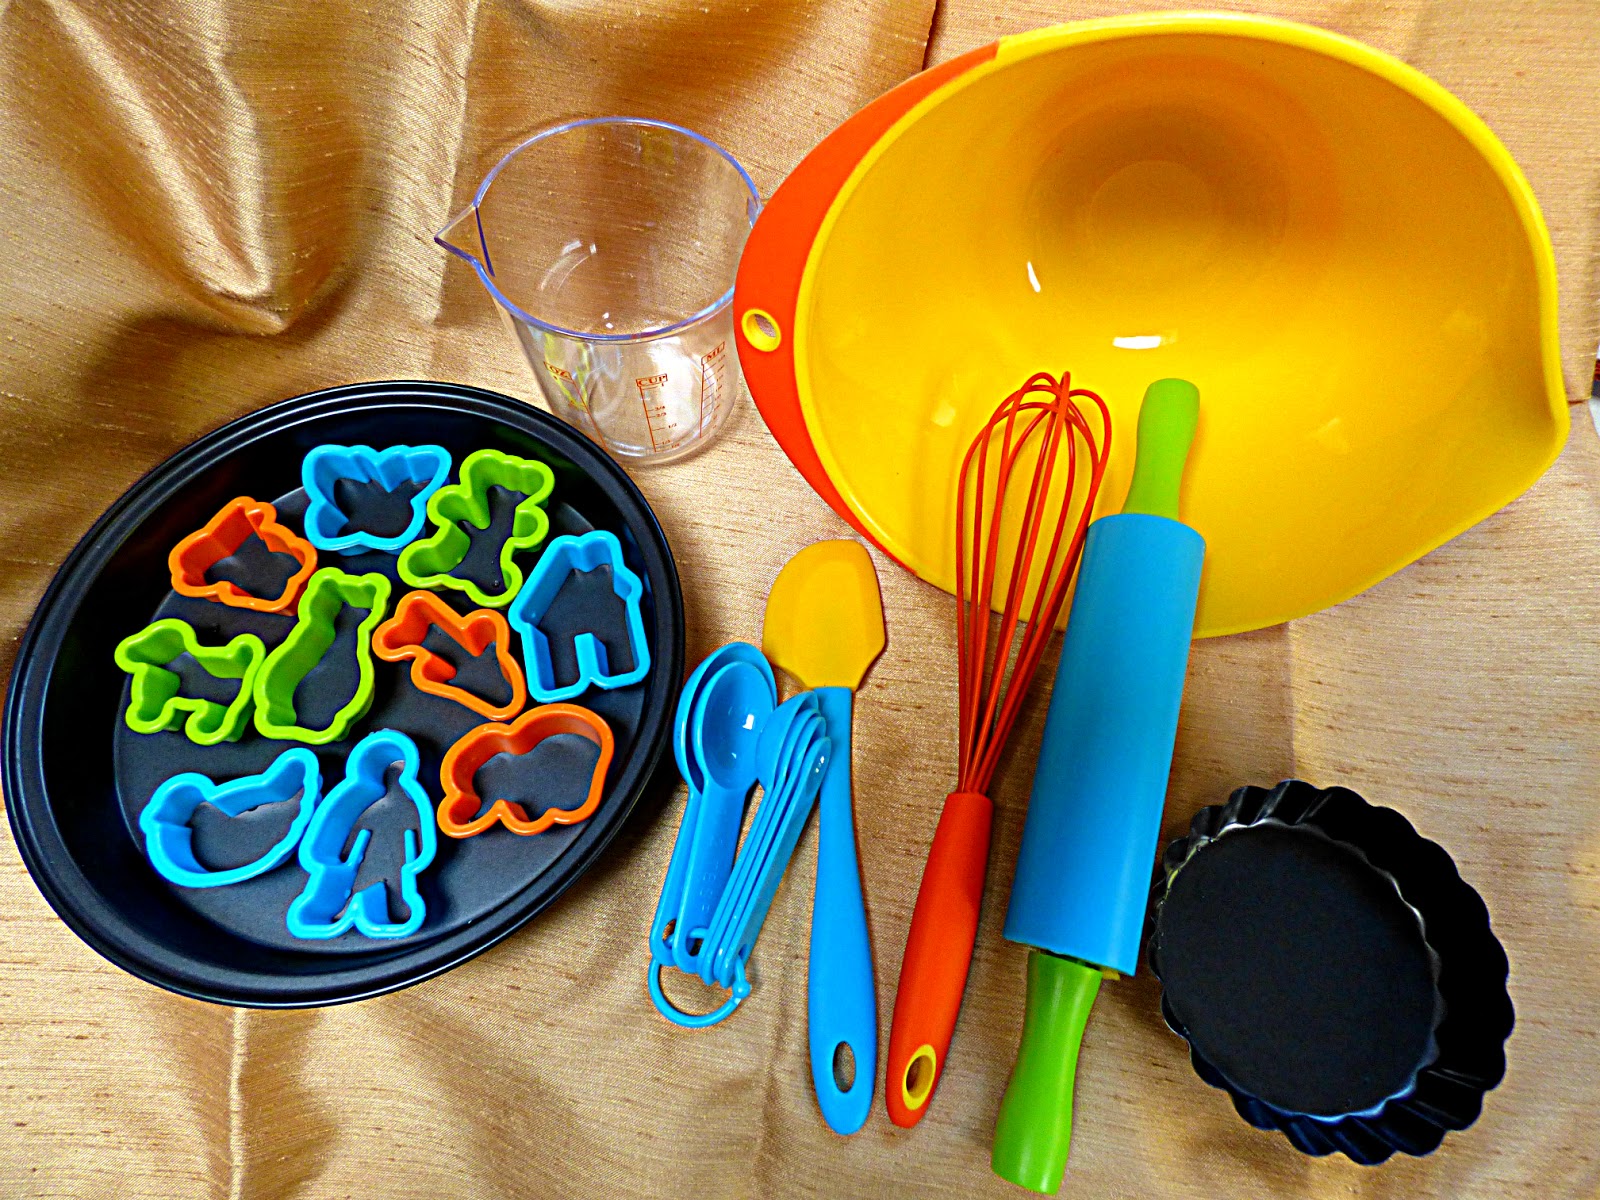
This set includes:
1 round baking tin
1 mini tart pan
10 cookie cutters
6 measuring spoons
1 silicone spatula
1 measuring jug
1 mixing bowl with anti-slip base
1 silicone handle whisk
10 recipes


As you can see, all the tools are colourful and cheerful. Most of them are made of plastic (apart from the tins). They are light in weight, and can be easily handled by younger children, like my 5-year-old son. He loved the cookie cutters the best
The bright yellow mixing bowl has an anti-slip base. We have tested most of the tools in the set (except the handle whisk which we haven't had a chance to use yet).

During out first baking session we baked a bigger apple and rhubarb pie, using the bigger tin, a spatula and a butterfly cookie cutter for making pastry decorations on top of the pie.
I used the ready-made Jus-Rol shortcrust pastry as the base for both this pie and the mini-tart, which Eddie wanted to fill with raisins. Once baked blind, we filled in both pastry cases with the apple and rhubarb filling, which I cooked with sugar and a bit of water. Both were then baked in the oven at 180C for about 15 minutes.
Apple and rhubarb pie
Eddie insisted on adding raisins to his mini-tart.
And yes, wearing a Superman costume while baking helps to be efficient
Later, when we had our pie and tea in the garden, he ate his own creation with gusto.

Mmm, mmm, good
The apple and rhubarb pie was lovely too. I served it with a bit of cream. And it disappeared very fast.


Today we baked a big batch of lemon cookies. The original plan was to follow Annabel Karmel's recipe as printed in the leaflet. You need 100g of cubed soft butter, 50g caster sugar, 150g plain flour and zest of 1 lemon. So far, so good, but the dough was not right in consistency, it was too crumbly and dry, there was no way I'd be able to roll it out. I added 1 medium egg and a tablespoon of lemon-flavoured olive oil.
Now I had a good working dough, which I rolled on the working surface, dusted with flour.
We had enough cookies to fill in 3 trays.
Once baked for about 10 minutes at 180C, we left them to cool.

Lemon cookies, raw and baked
In the meantime, I made some icing.
Eddie was very enthusiastic when decorating the cookies. I gave him different kinds of sprinkles, sugar hearts and silver pearls.


Again, the proportions for icing seemed not quite right: if you add 3tbsp of lemon juice to 200g icing sugar, the ratio of liquid per dry ingredient is not working. I cut the amount of icing sugar in half, and even then 3tbsp of lemon juice were not enough, I added one more spoonful to get the icing of the consistency I wanted.
I appreciate that it might be considered presumptuous of me to criticize the recipe created by the queen of baking, but her recipe for lemon cookies didn't work for me.


However, once we tweaked the recipe, the cookies were delightfully light and zesty.

The testing of biscuits is a serious business

We loved working with this set. I would only suggest to expand the kit by adding several tart pans, as usually you wouldn't bake one small tart at a time. Several would have been much handier.
I may also suggest relying on your own expertise while following the recipes. We haven't tried all the recipes, but the lemon cookies recipe definitely needed adapting and adjusting. If we followed it, we'd have had a pile of crumbs rather than lovely cookies. Saying that, my son and I are planning to cook some chocolate biscuit cookies some time soon.

Thumbs up to lemon biscuits!


Disclosure: We received the pastry set for the purposes of testing and reviewing. All opinions are mine.

Ed's decorated biscuits

Thursday, 13 August 2015

OXO Good Grips Cookie Press


We all love freshly baked cookies in our family. The smell of baking wafting from the kitchen brings everyone downstairs, and we all cannot wait to tuck in. I was thrilled to have a chance to test an OXO Good Grips Cookie Press, as I have read good reviews online and fancied trying it myself.

The cookie press has a large lever handle, which is comfortable and easy to use. It won't strain your hand, even after making several dozen of cookies. The base is non-slip, so gadget doesn't move when you keep dispensing the dough into the cookie shapes. The dough barrel is see-through so you know exactly how much of cookie dough is left inside.
Very easy to assemble and disassemble.


How does it work? You prepare the dough, fill in the barrel, close the lid with the lever tightly. Place the cookie press on the surface with the parchment paper, lower the lever and a cookie shape should appear on the paper. The cookies are supposed to be consistent in size and shape.


The cookie press comes with a selection of stainless steel disks which include a daisy, flower, sunflower, fleur-de-lis, butterfly, bear, heart, leaf, shell, snowflake, tree and wreath. Quite a choice, and would suit a seasonal baking session. I have tried most of the disks and found the heart and flower-shaped ones the easiest to work with.

OXO Good Grips Cookie Press disks

The cookie press comes with an instructions booklet which also features 3 starter recipes. I have chosen a recipe for Cream cheese spritz cookies, and followed the recipe exactly as it is.
I have encountered some difficulties with the cookie dough sticking to the disc and not to the parchment paper, as it is supposed to. The first batch was all the same, I had to gently prize off each cookie shape from the disk, which is not as it should have been.
While the cookies themselves were very tasty (as confirmed not just by my family but by friends too), they didn't quite look the part. They have baked into shapes which were not much recognisable as flowers.


I have tested several disks, the heart-shaped one was the easiest to use, but even heart-shapes dough was sticking to the disk. Once baked, the heart might have looked like hearts, but the butterfly and the sunflower changed into some amorphic shapes, as you can see from the photos below.


And though the cookies were delicious, I was not very happy with the aesthetic side. They were a far cry from the crisp-edged cookies I envisaged them to be. It is also quite possible that I have chosen a really hot day to do my baking, but perhaps the recipe for cream cheese spritz cookies was not the best one to use in a cookie press. Saying that, all the cookies - and there was a whole lot of them - were gone in a few days.

cream cheese spritz cookies

I don't easily give up. A couple of weeks later on a much cooler day, I decided to have another go with the cookies press, this time trying a different recipe. I started with a basic recipe for thumbprint cookies as appearing in Sweet Treats book (Williams-Sonoma) but ended up changing it quite a bit, adding some ingredients (skipping the jam) and adapting it to use with the cookie press.

Butter almond cookies before baking

Butter almond cookies
Ingredients:
zest of 1 lemon, finely grated
285g plain flour
1/2tsp baking powder
230g butter, melted
120g caster sugar
3tbsp ground almonds
1tbsp golden syrup
1 egg yolk
1tsp vanilla essence
Grate the zest of 1 lemon. In a medium bowl mix all the ingredients: lemon zest, flour, baking powder, melted butter, caster sugar, ground almonds, golden syrup, egg yolk and vanilla essence. You will get a pliable soft cookie dough.
Fill in the cookie press and press out all the cookies on the trays, covered with the parchment paper. Bake for about 10 minutes until golden brown. Don't overcook. The cookies will be still soft when you take the trays out, on cooling peel them off the paper. They will turn crispy and crumbly, and perfectly buttery.

Butter almond cookies
I found this cookie dough easier to use with the cookie press, which worked much better this time.
So, my advice would be: experiment and find which cookie recipe works for you.
I definitely want to try more recipes, and will let you know how it goes.


Camilla from Fab Food 4 All has also tested OXO Good Grips Cookie press and posted a delicious recipe for Danish Vanilla cookies (Vanille Cranse) on her blog. Her Danish cookies look splendid.


Disclosure: I received an OXO Good Grips Cookie Press for the purposes of testing and reviewing. All opinions are mine.