Friday, 30 September 2016

Back to school with HelloFresh

HelloFresh meal - Yoghurt and Dukkah Crusted Chicken with Aubergine and Bulgur Wheat


September whizzed by, with back to the school routine, my Mum staying for a month, my in-laws visiting for a week, long-planned trip to London for a cooking masterclass in the Italian restaurant, volunteering at school and much more crammed in.
Just this week I went on a school trip to the museum with Eddie's class, did a reading class, attended the Harvest Festival service at the church today and baked cupcakes for the fundraising event.
I enjoy cooking, but sometimes preparing a varied menu on a daily basis could be more of an onus rather than pleasure.
I envy those organised people who plan their meals a week in advance, I surely do, but as much as I admire their organisational skills, it just doesn't happen in my life.
I appreciate all the help I can get, and was very happy to have a helping hand from HelloFresh this month.

Every week Head Chef Patrick and his team create new recipes with step-by-step photos. No planning on your part is involved, all has been done for you by the team.
You don't need to take long lists to the supermarket (I'm also known for writing long lists and then leaving them at home), traipse through the aisles and also buy a lot of random things just because they were on offer or caught your eye (does it sound familiar? I sometimes go in the supermarket to buy a bottle of milk and some bread, and end up with a full shopping basket).
So relax, it's all being done for you. All the ingredients arrive in exact quantities needed for three (or more) big meals.
All the foods arrive in a chilled recipe box - you can choose a day. Delivery is free too.
You can choose one of the three possible boxes - Classic, Veggie and Family; a size - from 2 to 4 people and the quantity of meals.
I had a good look at all the boxes, and it was a difficult choice. All the recipes looked delicious. As we're omnivores, I have selected a Classic Box with 3 recipes. Each meal comes at £4.92, a very reasonable price for a big creative meal.
The Classic box came chilled, the ice in the box hasn't even melted completely in the cooler pads.
All the meat, vegetables and herbs looked fresh.

There were three kinds of meat for three recipes - chicken breasts, beef steaks and a pork oregano sausage, as well as some dairy products - feta cheese and natural yogurt.


There was a wide selection of vegetables, herbs, spices and condiments.


Each card has a photo of the final meal, an easy guide on which ingredients you will need to prepare the dish and a concise step-by-step.

The first recipe I have prepared was Yoghurt and Dukkah Crusted Chicken with Aubergine and Bulgur Wheat. I butterflied the chicken breasts as suggested in the technique tip. Bulgur wheat was very easy to prepare. Aubergine and peppers were roasted on the tray in the oven, so it was just the matter of cutting and chucking it all in the oven.


The chicken was cooked in the oven, smothered with yogurt and sprinkled with dukkah spice. I haven't tried this Egyptian spice mix before. If like me you are not familiar with dukkah, this is a tasty spice mix made with celery, sesame seeds, chopped almonds, walnuts, peanuts, hazelnuts, pumpkin and sunflower seeds. thyme, coriander, cumin, cayenne, paprika, black pepper and sea salt.
As it was the first time I cooked with dukkah, I have halved the amount of the spice mix. The combination of yogurt and dukkah works very well. The chicken was moist and flavourful.


It was a delicious meal, full of beautiful flavours.
The portions were very generous. We had plenty of couscous left for the next day's lunch.


The second meal was a Courgette, Broad Bean and Feta Orzotto with Pork Meatballs. This one was
the most time-consuming of the three recipes, as you also had to pod the broad beans.


It was a creative recipe but it did require quite a bit of ingredients. I have felt that there was no need for the peashoots leaves. They made the final dish prettier, but there was enough food on the plate without them. My impression - and I do mean it kindly - that whoever created this recipe, was over-enthusiastic. Sometimes less is better.
We also ended up with too much of the orzotto. It was a big pot, enough not just for the family of four but for a mini-army. I have packaged half of the orzotto into small plastic containers and put in the freezer.
I have finished cooking it in the pot in the oven, as it kept getting stuck to the big pan on the stove.


To speed up the cooking, the meatballs were made from the skinned pork oregano sausage. Because of the sausage texture, the meatballs were a bit dense. When I make my own meatballs, they have a fluffier texture. Saying that, they tasted lovely, with just the right balance of oregano.


Finally I cooked Seared Steak with Crispy Potato Salad. I love a good old potato salad, and this potato salad with green beans didn't disappoint. It was flavoured with roast tomatoes and garlic. I also love olives, so for me this was a win-win recipe. I didn't use all the potatoes at once.
I do tend to cook my steak well done, so it might look too dark for rare beef eaters. This is just a personal choice.


Verdict: The portions are very generous. The quality of ingredients is excellent.
I enjoy cooking, but having a break from planning and shopping was a big bonus. It is a real treat for me when someone else takes care of the menu planning. It was very convenient to have all the ingredients prepared. It was particularly helpful this month, as getting back into the school routine sucked all my energy.
Readjusting to early mornings and a bigger daily load of washing and ironing, plus helping with school homework and volunteering, I appreciated the convenience of HelloFresh service.

If you like the look of these recipes, you can download all of them in HelloFresh Archives section - for these meals go for September 2016.

Disclosure: I received HelloFresh Classic box for the purposes of testing and reviewing. All opinions are mine.

Dark chocolate lover giveaway E: 28 October 2016

When it comes to chocolate, dark chocolate is "my favourite and my best", using Lola's (of Charlie and Lola's fame) expression. Imagine my delight when I discovered that Waitrose has expanded its range of dark chocolate by introducing several new flavours. I confess I went a bit over the top, buying lots of dark chocolate bars. My excuse is they were on offer.
As the evenings get darker and darker, and the school days are tiring, I think a little bit of dark chocolate is an excellent perk-me-up.
To cheer up myself, I am offering five bars of dark chocolate as a giveaway prize for my blog readers.
One lucky winner will receive 5 bars - Dominican Republic Dark Chocolate (90% cocoa), Panama Dark Chocolate (80% cocoa), Haiti Dark Chocolate (85% cocoa), Peru Dark Chocolate (75% cocoa) and Costa Rica Dark Chocolate (75%). Does it sound tempting?!


T&Cs:

The giveaway is open to the UK residents only.
To be in with a chance of winning, please enter via the Rafflecopter form.
If you are leaving a comment as Anon, make sure there is your name or username so that I can get in touch with you. If you have a Twitter name, that's the easiest way to contact you if you win.
The winner will be selected by Rafflecopter. I will contact the winner regarding their address details after the closing date. If they do not reply within 28 days, the prize will be allocated to another person.
The giveaway will close on 28 October 2016 (midnight).

This is not a sponsored prize. I have purchased all the chocolate myself. I will send the prize by signed for post.

  a Rafflecopter giveaway

Thursday, 29 September 2016

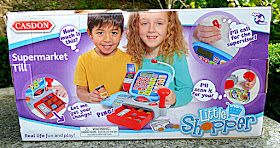
Casdon Supermarket Till


educational toys

Role play is an important part of learning about the world around us. Children learn through play. Role play or pretend play allows children to act out a role in a fun way. It develops communication and social skills as children interact with each other, it boosts imagination and creativity and allows kids to explore and discover. Casdon, inventors of fun and play, realise the importance of role play. Their range of educational toys is varied and extensive.
Casdon Supermarket Till is a new fun educational set. I remember similar till sets in both nurseries and Reception classes my children went to, but they were much more basic in comparison.
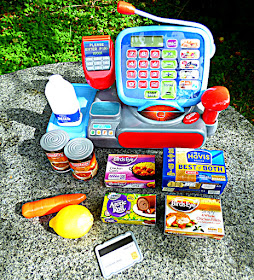
This till is a super modern updated version. You will need to install three AA batteries.


educational toys

It comes with a touch-sensitive screen, a working calculator and a microphone. There is a scanner, a chip and pin feature, opening cash till and a selection of branded play food.
The supermarket till can teach children about money - you get a selection of plastic coins to play with.

The food items come without labels, so you will need to attach the stickers yourselves. This was pretty straightforward and easy.


How does the toy operate? Chip and pin unit can be swivelled. To operate you push your cash card and press the small keypad four times.
There is a pretend weighing scale and control panel as well as a pretend produce shelf.
The calculator has a keypad with an LCD display. There is a power on/off button. You will also find food and produce short cut buttons; when pressed they add a predetermined values to the calculator.
The microphone at the top is flexible and is supposed to amplify voice.
The scanner gun bleeps and adds a random value to the calculator.


The food and drink items represent familiar brands including some British classics like Hovis bread or Birds Eye Arctic Roll. Cute Baxters soup tins were my personal favourites.


This fun educational toy set - which is a great source of role play - will make a wonderful gift for children aged 3-8 years. It also has a great potential for classes with special needs children.

The only criticism I'm raising is that while installing the batteries, I really struggled with the fixing screw. I have tried a selection of screwdriver head attachments to move it open, none of which seemed to work. By the time I managed to open it and close the lid back, the actual screw got almost shapeless. I think changing the batteries again will be an issue. It's not just this toy. I have noticed many toys which require batteries have tricky screws. Or is it just me?

We also thought that the added values were too random and didn't quite reflect the realistic prices of the real life products. I appreciate this is a toy, and is not meant to be too realistic. This didn't stop my son from enjoying the set.
I was wondering if he would think himself too "grown-up" for the supermarket till, but he seemed to be engrossed in the play. And when I asked him if we might take the set to school to give away to the Reception class, he asked me "Mummy, could we keep it?".


For more information and competitions check out CasdonToysUk on Twitter and Casdon on Facebook.

Disclosure: We received this toy set for the purposes of testing and reviewing. All opinions are ours.

Wednesday, 28 September 2016

Roasted tomato and garlic borlotti beans hummus


Borlotti beans also known as cranberry beans are used in many classic Italian recipes, from stews to burgers.
The latest Degustabox included three tins of Cirio borlotti beans. I'm a big fan of Cirio tomato products, but didn't realise they have beans and lentils as well in their extensive range. Each tin contains 150g borlotti beans in water. They have been pre-cooked in steam and are ready to eat. You can add them to salads or ragu.


Italian foods

I recently bought a jar of tahini for making hummus, so decided I'll try making a hummus using borlotti beans as well as roasted tomatoes and garlic for extra flavour.

Roasted tomato and garlic borlotti beans hummus
Ingredients
250g tomatoes
2tbsp olive oil
a glug of soy sauce,
2tbsp balsamic vinegar
a dash of vodka (optional)
5 cloves of garlic
2 tins of Cirio Borlotti beans (150g each)
2 heaped tbsp tahini
sumac and a tablespoon of chopped pistachios for decoration

Place tomatoes in a small roasting dish, pour over the olive oil, soy sauce, balsamic vinegar and vodka, add the cloves of garlic. Place the roasting dish in the oven preheated to 180C for 25 minutes. Leave to cool before peeling the skins off the tomatoes and garlic.


Rinse the contents of two tins of borlotti beans and let all the water drain before placing the beans in a medium sized mixing bowl. Add the tomatoes and garlic. Add 1-2tbsp of the juice leftover from the roasting of tomatoes. Add tahini and season with salt. Using a hand blender, blitz the beans and tomatoes into hummus. Sprinkle hummus with a bit of sumac for colour (or use paprika instead) and add a few of chopped pistachios to decorate.
Serve with bread chips or bread sticks, as well as cucumber or carrot sticks.


Disclosure: I receive a monthly food subscription Degustabox for the purposes of testing and reviewing. All opinions are mine.


Sunday, 25 September 2016

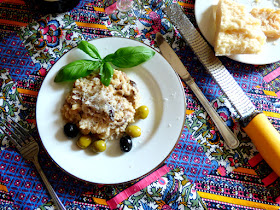
Mushroom and chestnut risotto

Just in case you were wondering why I haven't been blogging much in the last month, I was super busy. My Mum was staying with us for a month, plus my in-laws came visiting from Italy for a week. That and the back to school hullabaloo left me with not much time for blogging. My in-laws have left, my Mum flew back to Russia this very morning (sob! I miss her already), and now I will need to catch up on one zillion posts that I have planned. I haven't been entirely distracted from my hobby, as I kept cooking and taking photos, but writing and editing photos was put on hold. 
When my in-laws were visiting, I cooked most of our dinners - apart from one evening when we went out to The Fleece. One of the meals that I cooked recently was a mushroom and chestnut risotto.


I have recently received my big prize from Grana Padano - a whole big wheel of cheese weighing 18kg (if you don't remember how I won it - have a look at the post - Grana Padano Top Chef Blogger Competition). That's a year's supply of cheese. I didn't imagine it would arrive all in one go. I've been sharing it with friends and neighbours, and even insisted that my in-laws and Mum should take some cheese with them, though I do appreciate it might be funny to bring an Italian cheese back to Italy.
I have also been adding it to lots of meals. It is such a beautiful tasty cheese, wonderful to nibble on and excellent in cooking too.


I've had a pack of whole natural chestnuts which are already peeled and cooked and kept in a vacuum sealed bag since before Christmas. I remember they were on offer, and I was a tad over-enthusiastic and bought several packs. I suppose I could have kept it until the next Christmas, but I wanted to cook a risotto for dinner and liked the sound of the recipe printed in the back of the box.
I have adapted the recipe, halved the amount of chestnuts and used different mushrooms as well as did some other minor changes.

Mushroom and chestnut risotto
Ingredients:
1 medium red onion, finely chopped
200g mixed exotic mushrooms
2tsp butter
200g arborio rice
2tbsp olive oil
450ml vegetable stock + more if needed
100ml white wine (or mix of dry white and rose)
100g whole cooked chestnuts (for example, Porter Foods Whole Natural Chestnuts)
100ml single cream
Grana Padano, to grate over the risotto

Finely chop an onion, add oil to the frying pan and gently fry the onion for about 5 minutes, then add the butter and chopped mushrooms. I used a pack of mixed exotic mushrooms for extra flavour, but a combination of white and chestnut mushrooms will work as well. Cook for another 3-4 minutes, stirring often.
Add the arborio rice, and cook for 2 minutes, stirring often. The rice should be well coated in oil and butter. Pour the wine over the rice, cook stirring until the liquid has been absorbed. Ladle some of the vegetable stock over the rice, keep stirring while cooking. Keep adding the stock until most of it has been used, then add the single cream and chopped chestnuts.
It will take 25+ minutes for a risotto to be ready. For an authentic taste, it should still be al dente. If you prefer your risotto to be well done, keep cooking until you get your desired consistency and texture.
Serve hot, with a generous helping of grated cheese on top.
Grana or Parmesan, the choice is yours.

Italian risotto recipe

In case you're curious I love Gallo arborio rice for cooking risottos. It's a superior rice with an excellent taste.

Italian recipes

As I used a semi-forgotten pack of chestnuts in this recipe, I'm adding this post to #KitchenClearout linky run by Cheryl from Madhouse Family Reviews.


Saturday, 24 September 2016

Carrot banana cake - #GameOnCooks


When it comes to baking, The Women's Institute which was founded in 1915, is a great authority. Last year I picked up a copy of The Women's Institute Big Book Of Baking reduced from £25 to £2.99. And though most recipes looked familiar, there were quite a few recipes with a twist on the much loved British classics.
I bake a carrot cake at least a couple of times a month, sometimes every week, as this is one of our family favourites. I have tried many carrot cake recipes, some were delicious, some less so.
The Women's Institute has created a carrot cake recipe with a twist - adding a banana to the cake batter and swapping the cream cheese frosting for buttercream frosting.
I have fancied trying the recipe, but have adapted it and changed the frosting back to cream cheese, simply because my guys are not overly keen on buttercream frosting. I have also skipped the dessicated coconut and did some other minor changes, but the overall idea of adding a banana to a carrot cake was a novelty to me. The WI named it a Passion Cake, not quite sure why, but I'll go for a more descriptive Carrot banana cake.


Carrot banana cake
Ingredients:
zest of 1 orange
1 banana, mashed
1tsp baking powder
1tsp ground cinnamon
1/3tsp ground cloves
1/2tsp ground allspice
200g crunchy demerara sugar
a pinch of salt
170g carrot (peeled weight), grated
3 medium eggs
45g walnuts, chopped finely + more for decoration
125ml vegetable oil
2tsp ground hazelnuts (optional)
225g wholemeal flour
For the cream cheese frosting:
200g cream cheese (I used Philadelphia original)
150g icing sugar
100g softened butter

Grate the zest of 1 orange in a big mixing bowl, add a peeled banana and mash it with a fork. Add the baking powder, spices, demerara sugar, a pinch of salt, grated carrot, beat in the eggs, mix well. Add the chopped walnuts, oil, flour and ground hazelnuts. The original recipe asks for dessicated coconut, but I couldn't find any in my kitchen, so I have reduced the amount of vegetable oil to 125ml and added a couple of heaped teaspoons of ground hazelnuts. Mix all the ingredients together, and pour the cake batter into a well buttered round cake tin. Place the tin in an oven preheated to 200C and bake for about 45 minutes until golden brown (check if it's ready with a wooden toothpick).
Remove from the oven and leave it in the tin for 10 minutes before removing out of the tin to cool completely.
Slice the cake in half horizontally.
Make the frosting with the cream cheese, softened butter and icing sugar. Spread 1/3 on the lower layer of the cake, sandwich it and top up with the remaining frosting. Sprinkle some finely chopped walnuts on the top.
Enjoy!

In this recipe I used a Lurpak unsalted butter to make a delicious cream cheese frosting. For the tasty frosting you need the best ingredients - a quality butter and a decent cream cheese. I used Philadelphia original. In the past I have tried Light and Lightest Philly, but they didn't quite work. They might be less in calories but make a runnier frosting, so the choice is yours.


And that's my second bake for #GameOnCooks.
To encourage us to do more cooking, Lurpak has started a new Game On, Cooks campaign. It's challenging Brits to turn their screens off and ovens on. Their motto is "You're not a cook until you cook".

If you're curious about the vintage style magazine used in the photos, this is a replica magazine from 1950s Household pack from Historic Newspapers. This replica memorabilia pack is a splendid educational resource, great for a school project or for bloggers who might use them in vintage themed posts - be it a fashion or recipe post.
This pack contains a Ration Book, Timothy Whites Xmas brochure, household bills, TV and 1950s Radio brochure, housework ephemera, mini postcards, leaflets on Belling fires and kitchen cookers as well as advertising images. These colourful prints were carefully scanned and printed as close to the original as possible.
I love the random choice of items in this pack.
For someone who loves rummaging at the flea markets and vintage shops, looking for memorabilia, this is an inspiring little gift.


Tuesday, 20 September 2016

Curd cheese cake - #GameOnCooks


I used to watch a lot of cooking shows in the days before children. I would run home after work to watch Ready Steady Cook, does anyone even remember it? Later, when Eddie was a baby, I was quite addicted to Come Dine with Me, though I haven't watched it in the last couple of years.
GBBO attracts over 10 million viewers per episode every week, and though I have an occasional peek at it, I'm not the biggest fan.
When I read the research conducted by Lurpak that the average Brit spends more than five hours a week consuming food culture and cooking for just four hours, I thought, that's not me then, I don't watch TV much these days. But then if you add up the time I spend reading foodie blogs and cook books, and visiting Instagram and Pinterest, it could easily be more than five hours per week for me.
Though in my "defense" I must say I do a lot of cooking, definitely more than four hours per week, at least a double of that.
To encourage us to do more cooking, Lurpak has started a new Game On, Cooks campaign. It's challenging Brits to turn their screens off and ovens on. Their motto is "You're not a cook until you cook".

I love baking, so for this challenge I have picked a simple cake recipe.
It is based on a family favourite - ricotta cake - but this time I used a curd cheese rather than ricotta. And it was a great success.


Curd cheese cake
Ingredients:
zest of  1 orange, grated
3 eggs
200g caster sugar
200g curd cheese
1tsp baking powder
300g self-raising flour
100g butter, melted
1tsp vanilla bean paste

Grate the zest of 1 orange in a deep mixing bowl.
Beat in the eggs with the caster sugar, add curd cheese, baking powder, flour, vanilla bean paste and melted butter and mix well.
The cake batter is quite thick. Spoon it carefully in a well oiled cake tin. Put the bundt cake tin in an oven preheated to 180C for 45+ minutes (depending on the size of the bundt tin). Check with a wooden toothpick if it's ready. You might need to lower the temperature and bake it for another 10 minutes, until the skewer comes clean.
Sprinkle some icing sugar on the top.
Serve warm or cold. It will keep well for a couple of days, wrapped in foil.


You can swap the ingredients: curd cheese for ricotta, orange zest for lemon zest or even clementine.
I used Lurpak unsalted butter in this recipe, but any good quality butter will do.


Disclosure: I received a supermarket voucher to buy the ingredients to take part in the campaign.


Thursday, 15 September 2016

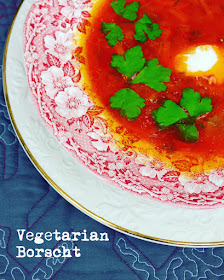
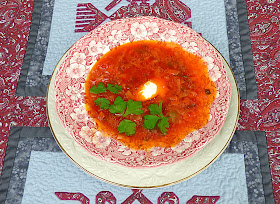
Vegetarian borscht

Russian food, Russian recipes, vegetarian soup


Shopping with my Mum is a dangerous thing, she encourages me to spend way too much. We're just back from traipsing through all the main shops in town, as I was looking for a new top. I'm going to London on Saturday to have a master-class on Southern Italian cooking, and I want to look "naice". Rather than buy one top, I bought three in White Stuff, especially that they have a 20% off event today. Did I really need three new tops? Probably not, but I blame my Mum for the shopping spree.
It's been lovely to have Mum staying with us this month, but the time is ticking, and in just over a week she'll be heading back home. We see each other once a year, and try to make the most of it when we are together.
Every time Mum comes for a visit, I ask her to cook some of my favourite dishes. This time Mum offered to cook a vegetarian borscht.

Russian soup recipe


Vegetarian borscht
Ingredients:
3tbsp vegetable oil
2 medium carrots
2 medium beets
2 big potatoes
1 small parsnip
1 sweet pepper
1/2 small white cabbage
1/3 green Chinese cabbage
2 tomatoes
2tbsp tomato paste
1 cube of vegetable stock

Chop all the vegetables.


First add the chopped beets to the frying pan with 2tbsp of vegetable oil (sunflower or rapeseed).
Cook on low for about 10-15 minutes, sweating the veg and stirring frequently. This brings the sweetness out, and the beets acquire a deeper flavour.
I have mentioned already in the other borscht recipe posts that you might skip the frying bit and put all the sliced vegetables together, but you won't get the same depth of flavour. Remove the cooked beets and add them to the big cooking pot.
Repeat the process with the chopped carrots, add a bit more oil to the frying pan. Slightly fry them with the finely sliced parsnip and sweet pepper.
Plunge whole tomatoes in the boiling water, then into cold one, so that you can peel them easier. Chop the tomatoes. Add the tomatoes to the pan with the tomato paste. Add the chopped cabbage and potatoes as well as the stock cube.
Pour enough water to cover all the veg and about 2cm over. Cook for about 20 minutes.

When cooking a borscht, I like to add a couple of tablespoons of tomato paste. Though Cirio is an Italian brand famous for its tomato products, and this is a Russian recipe, Cirio tomato paste is an excellent ingredient for the Russian soup.

If you're an omnivore and don't care much for vegetarian recipes, I have a couple of posts for meat-based borscht which Mum cooks - see Mama's borscht (with chicken) and Mama's borscht with meatballs. Both are delicious.

Russian food recipes

Disclosure: I received a selection of Cirio products for using in recipes.

Tuesday, 13 September 2016

Apple and raisin cake

autumn garden

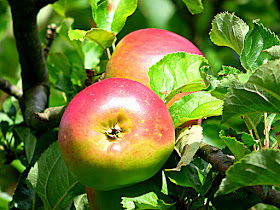
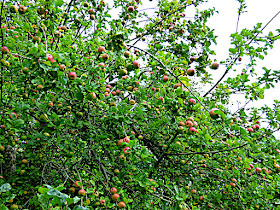
Early autumn is a beautiful time of the year. Apple trees in our garden are groaning under the weight of apples. I try to add apples to as many dishes as possible in autumn, plus make jellies and chutneys.
Many of our neighbours have their own fruit in the garden, and you often pass by a big crate of apples or pears (or quinces if you're lucky) outside someone's door, offering free fruit.


Last Sunday when my husband and Eddie went to the church service, I took Sasha out to his favourite cafe and later book shop. While he was browsing the local guides' section, I was looking at the GBBO-themed display of books including a book of Mary Berry's bakes.
The seventh season of GBBO is full on melodrama and tears. I can't say I'm the biggest fan. Last year I haven't watched it at all. Mr Hollywood grates on my nerves. He might be a gift to some women, but I find him unpleasantly arrogant and self-satisfied. And also bloody rude.
I browsed Mary Berry's recipes, when I came across an interesting-sounding bake - an apple cake with cocoa. I have adapted it a bit, and added eggs.


Apple and raisin cake
Ingredients:
1 large cooking apple, peeled and sliced thinly
1tsp butter
1tsp bicarb of soda + a squeeze of lemon juice
100g dark muscovado sugar
100g butter, melted and cooled
175g self-raising flour
a pinch of nutmeg
1tsp cinnamon, ground
1tsp cocoa powder
50g raisins, chopped
2 medium eggs
icing sugar for dusting

Start by peeling and slicing a big cooking apple. I used a rather tart variety. Melt 1tsp of butter in a small frying pan, add the sliced apple, and cook stirring with a dash of water until tender. Remove from the heat and let it cool a bit.
In a big bowl mix together cooked apple with the bicarbonate of soda and a good squeeze of lemon juice. I find that lemon juice cuts the sharp metallic taste of soda, mellows it and makes the bake taste better. Whenever the recipe asks for a bicarb of soda, I add lemon juice over it, until it all goes fizzy-fluffy. I can always taste soda in other people's bakes. Even a small amount is quite distinct.
Add the sugar and melted butter to the apples, then flour, spices, cocoa and chopped raisins (if they're small, don't chop them).
Australian apple and raisin cake is made without eggs, but the cake dough looked so dense that I added two just in case.
Ladle the cake batter into the well oiled cake tin, and put in the oven preheated to 180C. Bake for about 40+ minutes. Check readiness with a wooden toothpick.
Take the cake out of the tin, and dust with the icing sugar before cutting and serving.
It is lovely warm, and also the next day.
I was right about the eggs. I'm sure I sound as arrogant as Paul H, if I think I can improve a Mary Berry's recipe. Actually I was not trying to "improve" it, I just think for my taste it would have been too flat and dense otherwise. Sorry, Mary.
It would also benefit from more apples. One apple is not enough, you could hardly find the pieces in the cake. Next time I bake it, I'll use two apples. But the combination of apples and cocoa was really tasty.

apple recipes


autumn garden

Adding this recipe to #KitchenClearout linky run by lovely Cheryl from Madhouse Family Reviews.


I'm also joining with We Should Cocoa linky run by one and only Choclette at Tin and Thyme.